

How to use advanced Jenkins Groovy scripting for live fetching of Docker images


There’s an easy way to fetch Docker images for Kubernetes deployment. The technique uses Jenkins Groovy scripting to query external API to populate a parameter box dynamically with Docker image tags from Dockerhub or a GCR/ECR private repository.
This technique is especially helpful for those who want to:
Deploy from Jenkins to a Kubernetes cluster Choose dynamic values to pass into Helm charts as variables when using Jenkins pipelines to deploy into Kubernetes cluster with Helm Pass those values to a raw “kubectl” shell command, for a quick-and-dirty experiment Send the Docker image versions to a custom script for production Kubernetes deployment (for example written in Python using the official kubernetes-python ) library)
In the following example, we make use of the Jenkins Active Choice Parameter plugin. It allows us to use any kind of Groovy script to retrieve external information or even run a sub-process script like Python or Golang, which is stored on the Jenkins master instance. These processes can help to query an external service like MySQL database or some APIs, to select a list of items that will be displayed in the selection box during Jenkins job, like this:
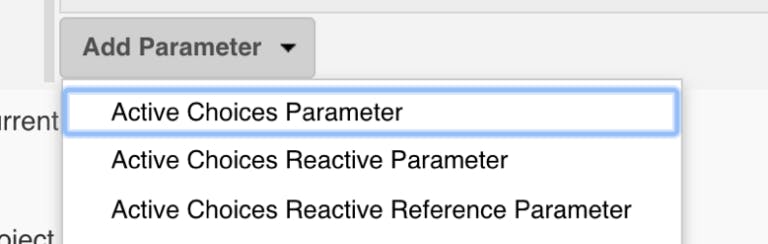
First, install the plugin to your Jenkins. It adds the following options to the parameter selection when you add a new job parameter (for both Freestyle and Pipeline type jobs):
The “Active Choices Parameter” allows you to insert a Groovy script that will return any List (array) of values that will be displayed in the selection and passed to the build steps as an environment variable value. The “Active Choices Reactive Parameter” adds more fun to the game because it will allow us to customize the parameters passed to the Groovy script itself!
To summarize, now we have these features enabled after installing the plugin:
- Ability to access any local script on Jenkins instance master and read its output
- Ability to use native Groovy methods and libraries to read from external sources
- A way to customize the inputs we pass to our Groovy scripts, to make them reusable
Selecting a Docker image version from Dockerhub
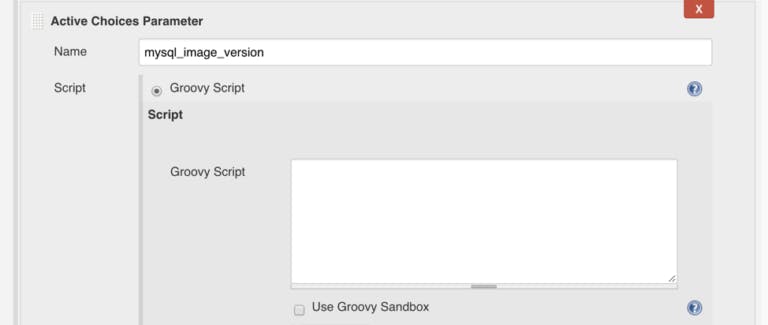
Let’s demonstrate the first option: Query Dockerhub API to list all available image versions for an official MySQL container. Create a new Jenkins job (Freestyle type), and add the Active Choices Parameter, naming it mysql_image_version and select “Groovy Script” as shown:
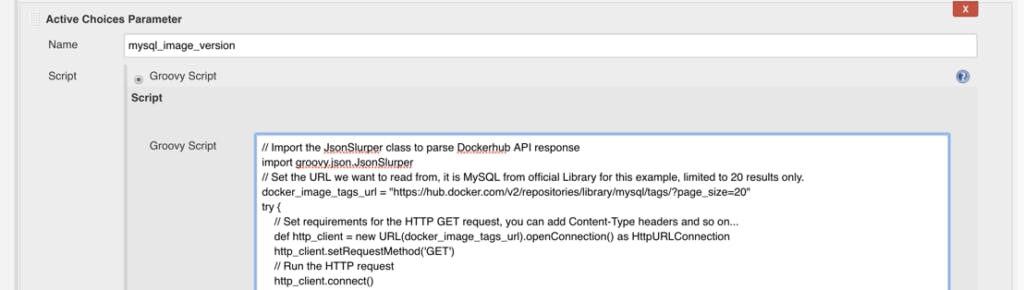
Then paste this simple script into the “Groovy script” text field which will access Dockerhub API to list MySQL image tags:
// Import the JsonSlurper class to parse Dockerhub API response
import groovy.json.JsonSlurper
// Set the URL we want to read from, it is MySQL from official Library for this example, limited to 20 results only.
docker_image_tags_url = "https://hub.docker.com/v2/repositories/library/mysql/tags/?page_size=20"
try {
    // Set requirements for the HTTP GET request, you can add Content-Type headers and so on...
    def http_client = new URL(docker_image_tags_url).openConnection() as HttpURLConnection
    http_client.setRequestMethod('GET')
    // Run the HTTP request
    http_client.connect()
    // Prepare a variable where we save parsed JSON as a HashMap, it's good for our use case, as we just need the 'name' of each tag.
    def dockerhub_response = [:]
    // Check if we got HTTP 200, otherwise exit
    if (http_client.responseCode == 200) {
        dockerhub_response = new JsonSlurper().parseText(http_client.inputStream.getText('UTF-8'))
    } else {
        println("HTTP response error")
        System.exit(0)
    }
    // Prepare a List to collect the tag names into
    def image_tag_list = []
    // Iterate the HashMap of all Tags and grab only their "names" into our List
    dockerhub_response.results.each { tag_metadata ->
        image_tag_list.add(tag_metadata.name)
    }
    // The returned value MUST be a Groovy type of List or a related type (inherited from List)
    // It is necessary for the Active Choice plugin to display results in a combo-box
    return image_tag_list.sort()
} catch (Exception e) {
         // handle exceptions like timeout, connection errors, etc.
         println(e)
}
The code snippet is extensively commented so we will not repeat all of it, but here’s the short summary of what steps the Groovy script will perform during load step of “Build with parameters” page, on the Jenkins master (the execution of those snippets is always on the master so make sure Groovy binary is installed and found in PATH of your Jenkins master server):
- We set the docker_image_tags_url path to Dockerhub API for “list tags” of MySQL official image and limit to 20 results to avoid lengthy output, you can customize that.
- Run the HTTP request and easily parse the response JSON using native Groovy module JsonSlurper. Now we can filter it, sort, extract data and modify it to prepare for output in the dynamic combo-box of the UI, it is extremely powerful and will allow you to automate the “select-box” of private Docker images and any other options like custom MySQL queries to run somewhere and return a list of information that you can use in your build job, or any other API calls to any service.
- We iterate the results and pick only the “name” of each tag metadata item (which is a JSON with full details about each image that is associated with a tag)
The return statement will send the List of results to the plugin which will populate the”select-box”, so a user can select any image from those which are actually available in the repository, instead of selecting from a manually pre-defined list of versions that the job creator has to type in and maintain.
After you insert the script into the text box, which will look something like that:
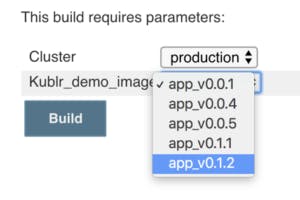
Try to run the job, and see what options does it list for this parameter. Click “Build with parameters” and open the mysql_image_version box:
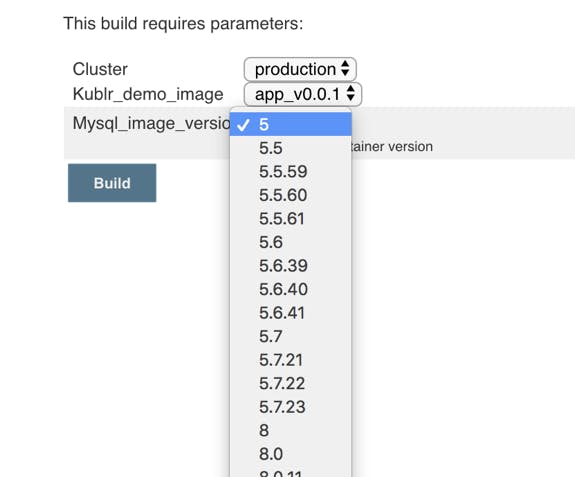
Yay! Pretty cool. We used the sort() to display them in order, but you can easily reverse or otherwise filter your image names, it’s just a Groovy List. The excellent official Groovy reference will help you to create fantastic and flexible scripts for the input boxes and the build steps.
Selecting GCR Docker image version dynamically
Now let’s see how to enhance the script and make it work with a private Docker images repository. Below, is an example of listing image tags from Google Container Registry using the official gcloud CLI tool to receive the full JSON of all tags for a particular image in your GCP project (a prerequisite would be to have the gcloud tool installed and authorized on your Jenkins master):
import groovy.json.JsonSlurperClassic

// get new auth token from Google Cloud for this session
def auth_token = "gcloud auth print-access-token".execute().text.replaceAll("\r\n", "")

// get specific image tags as JSON with all information about each tag, including creation timestamp
def url = "curl -s -u _token:${auth_token} https://gcr.io/v2/YOUR_PROJECT/YOUR_IMAGE/tags/list"
def gcr_tags_json = url.execute().text.replaceAll("\r\n", "")

// unwrap JSON to Groovy object
def data = new JsonSlurperClassic().parseText(gcr_tags_json)
// prepare an empty hash map to store sorted images later, the "key" will be a timestamp
def tags_by_date = [:]

// let's sort the images hash map by creation date?
def timestamps = data.manifest.collect{ it.value.timeCreatedMs }.sort()
data.manifest.each{ tags_by_date[it.value.timeCreatedMs] = it.value.tag[0] }


// remember we always must return a List in order for Jenkins to pick up the result
def sorted_tags = []
// simply put the image names into a List, but now it will be in strict order by timestamp (keys)
for(timestamp in timestamps){
    sorted_tags.push(tags_by_date[timestamp])
}
To use this code, substitute the YOUR_PROJECT and YOUR_IMAGE from the URL to your project name and Docker image repository name.
The script fills in the “select-box” with your GCR image tags in several steps:
- Authenticates with Google Cloud API to receive an access token (using ‘gcloud’ tool)
- Sends HTTP request to gcr.io/v2 API with your project and image repository names, and receives a JSON with all tags and their metadata like “image creation timestamp” which will be used to sort the list by date.
- Unwraps the JSON to Groovy object so you can iterate the fields and manipulate data.
- Sorts all tag objects by their “timestamp” field to receive an ascending list by date.
- Puts everything into a final Groovy List object. You will convert the sorted “hash map” into a simple “List” array because Jenkins only accepts a List as result of a script to fill in the “select-box.” You can’t send the hash map directly in a “return” statement.
As a result, you have a nice select-box that will display the latest 10 tags by timestamp.
Let’s test this using one of the public images. Replace YOUR_PROJECT with google-containers and YOUR_IMAGE with cadvisor (or any random image from Google public repositories list ) so you get a URL like this one:
def url = "curl -s -u _token:${auth_token} https://gcr.io/v2/google-containers/cadvisor/tags/list"
Put the script into the “Groovy Script” text area of the Active Choice Parameter and run the job. Here is the result of listing the last 10 “cadvisor” image tags using this script:
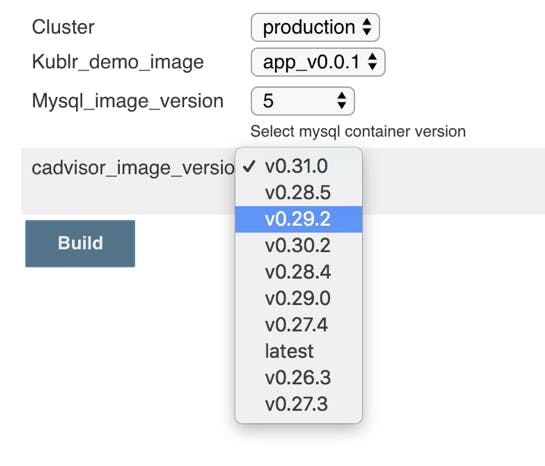
On the screenshot, notice that the tag “latest” is far behind v0.31.0, but that’s actually correct. If you check out the repository , you’ll see it’s the actual image publishing order. (They tag v0.28.3 as “latest” but have more versions, so a “fresh” image of “v0.28.5” was pushed after “v0.29.2” which is why it appears higher.)
For your images, you can also sort by numeric or alphabetic order instead of timestamp, depending on your project needs. Also, you can convert the select-box and its script into a Jenkins pipeline , and use in your existing pipelines with the help of Job DSL plugin.
Using Helm to deploy a selected image to Kubernetes cluster
Let’s take a look at how we can make use of this selection control to simplify a Jenkins Helm deployment to a Kubernetes cluster of any Helm chart. You can use any public or private chart to follow the demo.
For the purpose of this tutorial, we used the upstream latest MySQL chart here, and passed the selected “image version” from Jenkins to Helm command for both “helm install” and “helm upgrade” use cases.
We assume that you have an active ~/.kube/config file, or otherwise existing kubeconfig, that you pass to all kubectl or helm commands in Jenkins jobs and pipelines. Make sure the “helm install” or upgrade commands will target your chosen cluster (select the right context when you are working with several clusters at the same time from same Jenkins jobs. You can even select the cluster and context using the “Active Choice Parameter” plugin, similarly to how we selected the Docker images)
Pass the Mysql_image_version variable from the earlier Docker image select example to the Helm install command like this:
helm install --name mysql-demo --set "imageTag=${Mysql_image_version}" stable/mysql
This way you installed the needed MySQL version from those you selected directly from Dockerhub, without ever visiting Dockerhub, by using the controls in Jenkins.
This is super handy when your Ops team needs to deploy a release that one of the developers told them to do on a Monday ticket. The user can see exactly which versions are available in the repository right now, and know whether the image was already built and uploaded, or not yet, minimizing the risk for attempting to deploy a nonexistent image version and a risk of typos.
To use this as a “deploy” operation instead of a fresh install, you would run:
helm upgrade mysql-demo --set "imageTag=${Mysql_image_version}" stable/mysql
Also instead of the release “image version”, you can use the same technique for any options that you provide to the Helm chart during a deployment of Kubernetes applications.
Selecting AWS ECR Docker image version dynamically
For those using Amazon Elastic Container Registry, the procedure of retrieving Docker image tags is almost the same as for Google Cloud and Dockerhub. You can use either method – both direct API calls using plain Groovy HTTP libraries (which is the most stable but verbose choice for the script) or “curl” with parsing the JSON response, or (the quickest method) use the AWS CLI.
The CLI is useful because it can format the output as JSON if needed, and will silently use the IAM Role of Jenkins master instance – if your Jenkins master is also located on AWS – to gain access to ECR image information. Here’s an example of listing all tags for a private ECR repository image:
Note: It’s very similar to the GCR version of the script except the JSON structure that we receive and the CLI command.
import groovy.json.JsonSlurperClassic

// Get all images with tags as JSON, the --filter is very important to get only images that have a tag
def cmd = "aws ecr list-images --repository-name MY_IMAGE --filter tagStatus=TAGGED --region us-west-2"
def ecr_images_json = cmd.execute()

// Parse JSON into Groovy object
def data = new JsonSlurperClassic().parseText(ecr_images_json.text)

// Prepare the results list
def ecr_images = [];

// Add all tags
data.imageIds.each { ecr_images.push(it.imageTag) }

// Return the list for Jenkins "select-box"
return ecr_images
This code will:
- List all image tags from ECR repository in JSON format. And because you specified a “–filter” to show only Tagged images, it will not show the ones with no tags at all.
- Parse the JSON to allow its manipulations like sorting or extracting fields values.
- Fill in a Groovy List of results with image tags using the imageTag field from JSON.
Using the same method, you can also talk to Kubernetes API in order to show a dynamic list of available “namespaces” where an application can be deployed, or a list of “deployments” / “stateful sets” / “daemon sets” and other Kubernetes resources. That can be used in the build job to upgrade or modify a resource, similar to what was demonstrated with Helm upgrade.
Instead of passing the selected value to “–set” of Helm command, we can use a value in kubectl apply or kubectl patch commands to update anything in an existing resource, like updating a label or annotation that will affect the needed parts of our application, or updating the Docker image version in order to cause a rolling deployment to a new version. The rolling or immediate rotation depends on your deployment resource settings.
Render environment variables to Kubernetes YAML manifests with consul-template
In addition to these tricks for more powerful Jenkins deployments, you can utilize consul-template standalone binary to render environment variables like the ones supplied by Jenkins “select-boxes” directly into Kubernetes YAML manifests like service, deployment, ingress, pod, or any other resource. Download the binary from the GitHub releases page and put it in your PATH. Then the rendering from environment variables can be done by templatizing the YAML file, like this:
apiVersion: apps/v1
kind: Deployment
metadata:
  name: my-prod-application
spec:
  replicas: {{ env "NEEDED_REPLICAS" }}
  selector:
    matchLabels:
      app: my-software
  template:
    metadata:
      labels:
        app: my-software
    spec:
      containers:
      - name: our-cool-app
        image: cool-app:{{ env "DOCKER_IMAGE_TAG" }}
        ports:
        - containerPort: 3000
You can easily see which two values we are setting in this manifest using consul-template from environment variables. These are the replicas count with NEEDED_REPLICAS and Docker image version with DOCKER_IMAGE_TAG. To make consul-template write the variables into file, you can use this command:
consul-template -template "deployment.yml:deployment.yml" -once
It does just one simple thing: substitutes the placeholders in template with the values of environment variables. If we had DOKCER_IMAGE_TAG=v1.2.3 in the Jenkins job, our spec part of the container image in this manifest will become this:
image: cool-app:v1.2.3
Here’s a quick explanation of consul-template flags that were used:
-template needs two file names because the first is the “source template” and the second is the “target file.” Because we only want to quickly fill-in values into the same file, we just specify it as both the template and the target. It is useful because we expect each Jenkins job to “git clone” our manifests from scratch each time, and we don’t care to overwrite the “template” because we’re not pushing those changes back to git, so the modified “deployment.yml” can be instantly used with “kubectl apply -f deployment.yml” Of course, this depends on situation. If you’re doing full infrastructure as code approach then you will commit the changes back to git, so your “template” file name will be different, like “deployment.tpl” , and the target file will actually be committed to git after a successful deployment is completed. Just make sure to avoid committing back before verifying that the deployment passed, otherwise you will end up with different actual state of the cluster than what is written in Git repo.
-once is added to avoid entering a daemon mode where consul-template daemon is “watching a template” for changes indefinitely, and updates the “target file” each time a template has changed. This is not our use case, so we utilize the “once” flag to tell it render the file and exit.
Using these methods you can greatly simplify the CI/CD processes with Jenkins or any other tool that you use for deploying and managing Kubernetes resources (if your are interested in this topic, check out our blog on setting up a CI/CD pipeline with Jenkins, Nexus, Kubernetes ). Each of the techniques can be used in new and creative ways, in addition to other DevOps and development tools to speed up the processes of selecting, editing, substituting values in various templates, CLI commands or scripts.
We are big fans of simplicity and convenient tools that do most of the “non-creative” routine for you, and abstract the boring stuff away, like our own product Kublr. Kublr abstracts the difficulty of setting up and maintaining highly available multi-master Kubernetes clusters on different cloud providers or on-premises, to allow your team to concentrate their efforts on delivering the applications and avoid maintaining the inner-workings of a complex cluster. With Kublr you can create any number of production ready Kubernetes clusters with a click of a button, then simply connect with Helm and Kubectl to deploy your applications utilizing all the features Kubernetes has to offer like Rolling deployments, Autoscaling (based not just on CPU/Memory/Network consumption but also on user-defined metrics that your API supplies to the scaling controller), metric collection, alerting and monitoring with Prometheus and Grafana, centralized logging with ElasticSearch and Kibana, Auto-healing, Sidecar container injection, Daemon Sets, scheduled jobs, easy to use API to query any information about your workloads and modify the settings of any resources through the API (like modifying the ConfigMaps and Secrets which are many times used as a mount in container to supply a “file based” config to the binaries that run in container). There is no reason not to use Kubernetes when it offers plenty of features with almost zero effort in order to install and manage the infrastructure thanks to projects like Kublr. Try our Kublr-in-a-Box and see yourself how convenient Kubernetes clusters management can feel like from a single intuitive user interface.