
Setting up a CI/CD pipeline with Jenkins, Nexus, and Kubernetes

This is the first in a series of tutorials on setting up a secure production-grade CI/CD pipeline . We’ll use Kublr to manage our Kubernetes cluster, Jenkins, Nexus, and your cloud provider of choice or a co-located provider with bare metal servers.
A common goal of SRE and DevOps practitioners is to enable development and QA teams. We developed a list of tools and best practices that will allow them to iterate quickly, get instant feedback on their builds and failures, and experiment:
Self-service pipelines for build and release processes for developers. Every commit should result in a new automated build of a relevant service followed by any necessary tests.
Pipelines for QA engineers that run any type of testing (automatic or manual). Even those which replicate a full stage or production environment through a new on-demand Kubernetes cluster if required by test results. (You can easily launch or decommission a fully functional Kuberentes cluster through Kublr’s API).
Build and deployment pipelines should be built as code in version control and automatically tested when changes are introduced into the pipeline.
Simple deployment rollbacks should be automated based on thresholds. These thresholds can be based on metrics collected by Prometheus: if a new release works well, the pull request is merged. Additionally, the post-deploy error message rate in Kibana/Elasticsearch can be monitored. If a high error rate is detected (or “higher than usual,” in the case of a hotfix release for a partially unstable production service which already had some errors or warnings in its log), the deployment can be rolled back
Local secure artifact storage to keep all Docker images deployed in the Kubernetes cluster (it can be Nexus or Artifactory ).
Role-based access control (RBAC) for all platform users. Access to production and temporary clusters created during testing or development of complex features should be separated.
First, we will cover the initial setup and configuration of:
A Kubernetes cluster for Jenkins, Nexus, and Jenkins build workers;
The Jenkins master installed on Kubernetes;
The Jenkins master and Kubernetes integration to run the build workers;
Docker image for the Jenkins workers. We will spawn them inside the
Kubernetes cluster on demand when a build or deploy job is started on the master.
Nexus artifact storage for our artifacts and Docker images.
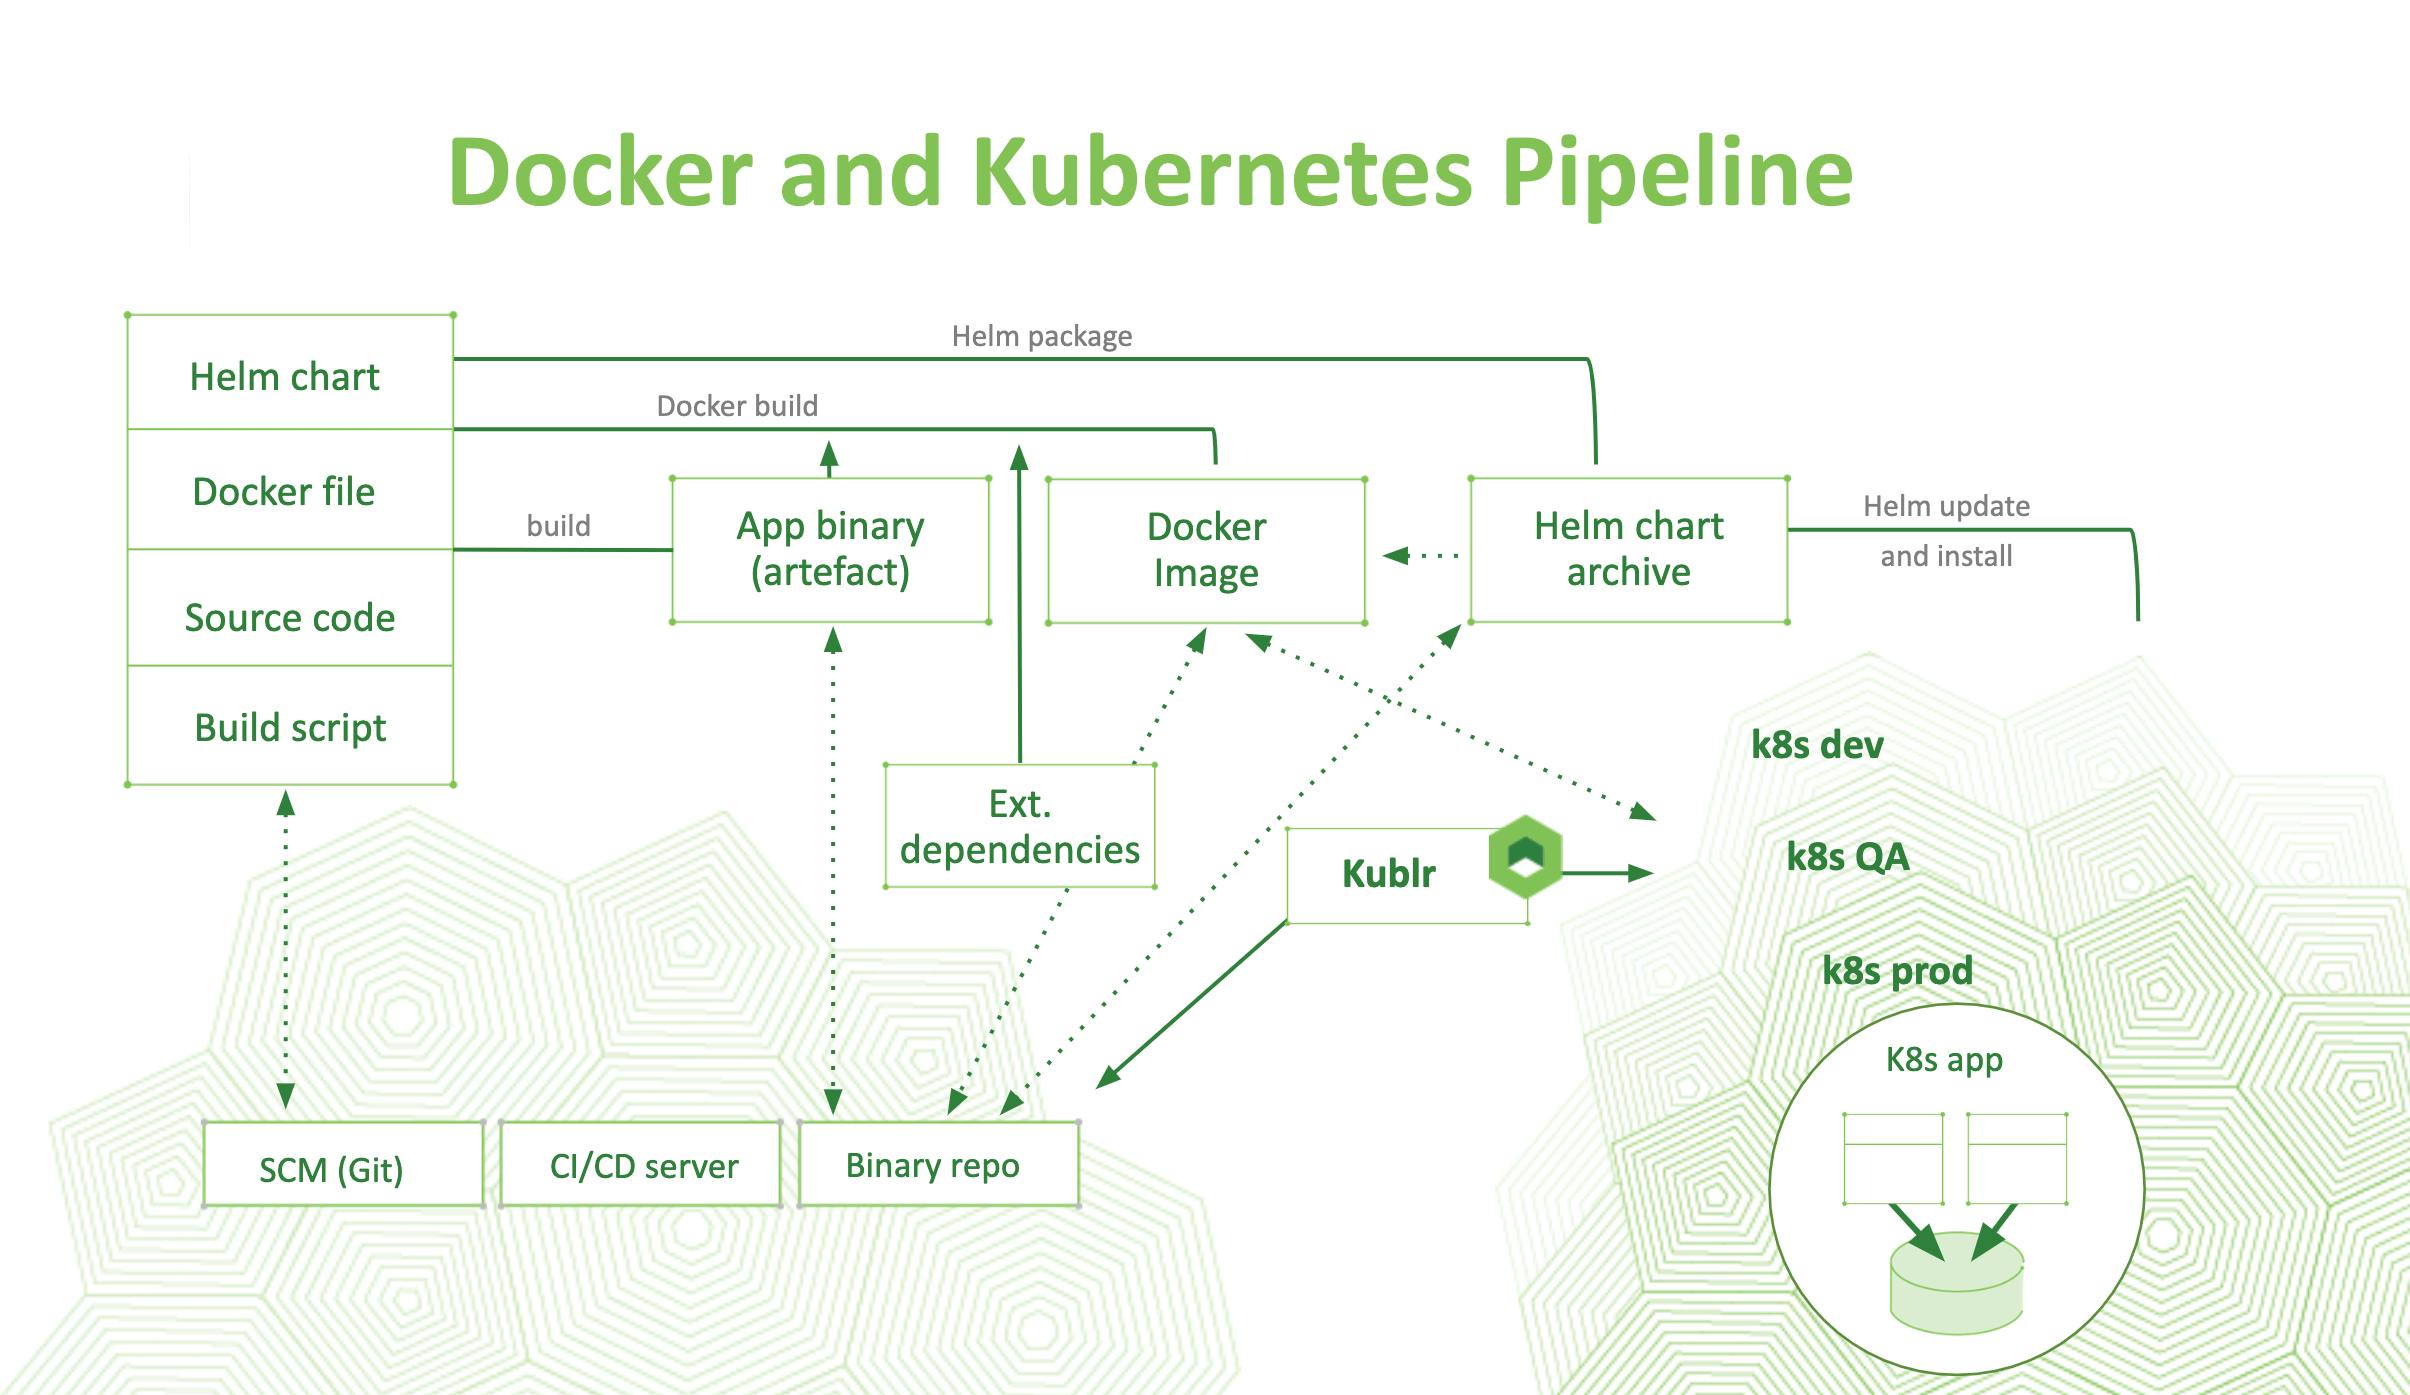
Assuming we have enough storage capacity, we can store the Docker images and other artifacts securely in the local cluster. During the build process, the artifacts will be securely pulled from Nexus within the cluster. Then they are built and packaged into a production Docker image saved on Nexus again. When we run our services, the needed images will be deployed on the cluster much faster than if they were pulled from the Internet. The benefits are obviously speed and security. You own the images and artifacts, and everything takes place inside the local network (or the local virtual network of the cloud provider like VPC in AWS, or VNET in Azure). This limits the ability of intruders to intercept the downloaded package and substitute content, using a MITM attack.
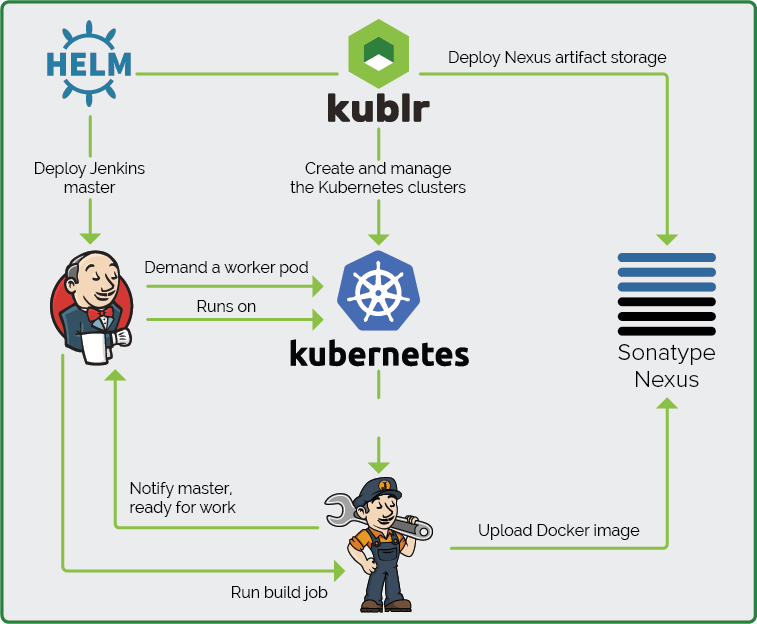
For this tutorial, we’ll focus on a static setup, with one Kubernetes cluster used for builds and deployment. For real-life deployments, you’ll want multiple Kubernetes clusters managed by Kublr (or a different platform) for different environments. You can even spin Kubernetes clusters up on demand for certain build/test tasks via Kublr’s API. That’s particularly convenient for full scale integration tests. Below is a diagram showing an advanced use case of Kublr in the CI/CD cycle. Kublr functions as a central management component for all Kubernetes clusters. It creates and terminates dynamic clusters with all relevant triggers of Helm deployments. Additionally, it monitors metrics inspection in the same pipeline where Kubernetes clusters are created using a few lines of code to call the Kublr API.
Tutorial Prerequisites
You’ll need basic Kubernetes knowledge, a test cluster (you can use an existing cluster or create a new one with a few clicks using Kublr) , and a strong desire to automate everything! Automation is the key to fast development iteration, based on instant feedback and self-service dev/QA/test environments.
Deploying a Jenkins Master on Kubernetes
Before we get started with the Jenkins pipelines, we’ll create a highly available Jenkins master in Kubernetes. Here is a quick diagram with a recommended setup which including a backup and disaster recovery plan:
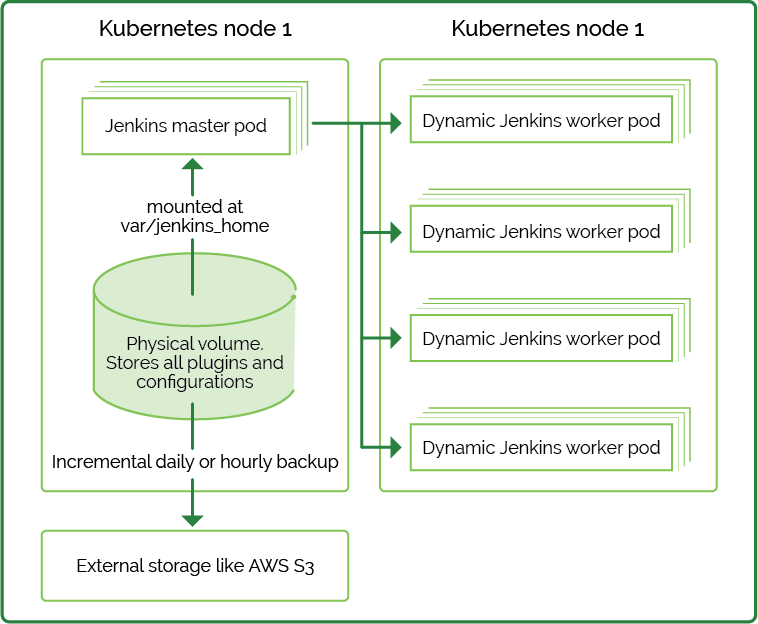
Each time a Jenkins job runs a new build, dynamic worker pods are created. We can run the builds inside the Kubernetes nodes, worker servers, and server pools (e.g., EC2 instances or static Linux, Mac, and Windows servers as usual).
Here is how disaster recovery should look like for our setup:
If a Jenkins master pod fails, Kubernetes will recreate it, and Jenkins will instantly get back to a working state. No actions required, except for a pod failure investigation.
If a physical node fails and volume data is lost, a new pod will be created with an empty mounted volume on a new node. This means that the external backup location (e.g. S3) must be restored on the physical volume of the newly spawned Jenkins pod. You can easily make a copy within the pod using “kubectl exec”. Copy the full backup from S3 (or whichever storage you used) into the mounted folder location (by default it’s/var/jenkins_home/ in the official Jenkins image). Then execute a “reload configuration from disk” command from Jenkins’ “Global configuration” page
All this is all possible with the publicly tested and fully featured Jenkins Helm chart (why should we reinvent the wheel?). We will, however, configure it using an existing well-designed and polished Helm chart from a stable repository. No need to download it. Helm CLI will do it when you run the install command. Before we continue, let’s go over the most important configuration options for persistent storage, backup, and recovery:
- persistence.enabled: if set to true, will use a PVC for the pod;
- persistence.size: specifies the PVC size (e.g. 10Gi, 50Gi, etc.)
- persistence.existingClaim: runs the Jenkins pod on top of an existing preconfigured PVC and specify the PVC name.
It’s also worth mentioning some important settings you may want to tweak before installing the chart. You can find them in the “master” section of the readme:
master.numExecutors: is zero by default, which means that any job will run on a slave pod. Should you need the master to be able to execute a particular job (e.g. custom legacy Groovy pipelines that use local files and run only on masters), you may need to set the desired number of executors on the master pod. This is not recommended, however.
master.resources: adjust values to a guaranteed QoS type. You’ll need to set the same CPU/Memory value for ‘requests’ and ‘limits’ in the pod definition. This configuration will protect the pod from being one of the first to be evicted when the worker node runs out of memory and Kubernetes starts freeing up memory by terminating pods. Also, make sure to set these values to a higher number if you plan to run a massive amount of jobs at the same time.
master.slaveKubernetesNamespace: to start your slave pods in a particular Namespace. Otherwise, they will start in the “default” namespace. It’s advisable to separate dev/QA/stage clusters. If you do run them in the cluster, you may want to put the slaves in a different namespace.
master.installPlugins: this is very useful! It tells Jenkins which plugins to download and install when the chart first starts. In case you would like to supply a list of plugins to this variable using a “–set” flag, make sure to include the following list of plugins, these are specified in the Helm chart values, and if you override the “installPlugins” variable with your own list and forget to include these, Jenkins might not work well. We recommend using the original “values.yaml” file when installing, instead of overriding the list of plugins through “–set”. Just append all other required plugins to the current list which looks like this in the “values.yaml” file:
installPlugins:
  - kubernetes:1.18.1

  - workflow-job:2.33

  - workflow-aggregator:2.6

  - credentials-binding:1.19

  - git:3.11.0
master.prometheus.enabled: will enable Prometheus monitoring which is great to track Jenkins workloads. It’ll also let you know when to add resources or which job consumes the most.
master.scriptApproval: a list of scriptSecurity Groovy functions to whitelist (well-known list for Groovy pipeline developers).
The Jenkins agent section configures the dynamic slaves that will run in the cluster. The most interesting configuration settings are:
agent.image: to specify your own Jenkins slave Docker image. This will allow you to create a custom builder with your own tools. Use “FROM jenkins/jnlp-slave” in your Dockerfile and build on the standard jnlp slave image. That way, Jenkins can seamlessly run your image as a slave pod.
agent.customJenkinsLabels: allows you to add a list of labels in Jenkins. It’s the equivalent of creating a node manually in the global configuration and assigning it a label. You can later use this label as ‘node selector’ in any Jenkins job to specify which worker nodes the job should run on.
Install and run the Helm command to work with the cluster. Ensure you can see the existing helm release list so you know Helm is properly configured (if you use a Kublr demo cluster, you’ll see a few default Helm releases installed):

Good to go? Then proceed with installing Jenkins with persistence enabled, download the values.yaml file, specify the required sections (e.g., persistence, agent and master), then run this command:
helm install --name jenkins -f your_edited_values_file.yaml stable/jenkins
You should see something like this with instructions on how to read the initial random password from the secret written in the bottom:
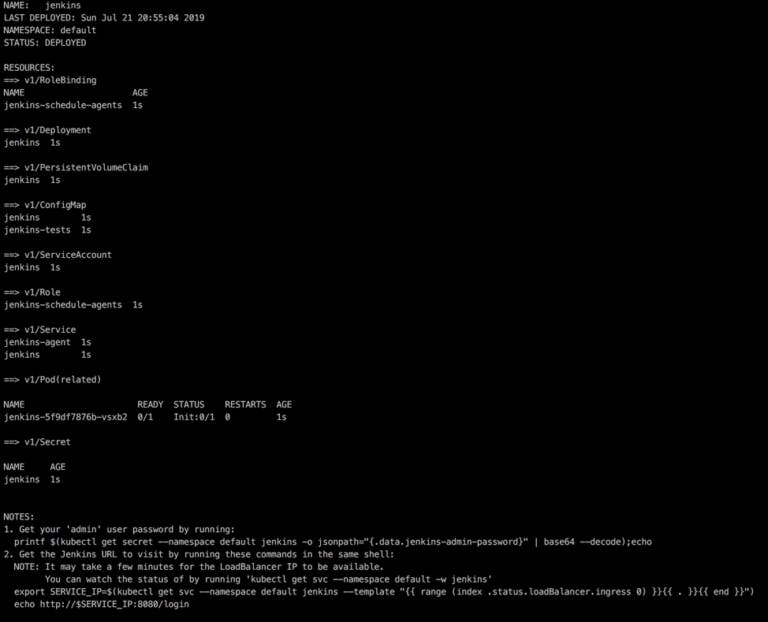
Run the example command to get the password:
printf $(kubectl get secret --namespace default jenkins -o \
jsonpath="{.data.jenkins-admin-password}" | base64 --decode);echo
Now run this, to get the URL for the LoadBalancer of Jenkins service:
export SERVICE_IP=$(kubectl get svc jenkins --namespace default --template \
"{{ range (index .status.loadBalancer.ingress 0) }}{{ . }}{{ end }}")

echo http://$SERVICE_IP:8080/login
Then, go to the URL, log in as “admin” and the password you received earlier. When you first log in, you’ll see that there aren’t any executors and nodes:
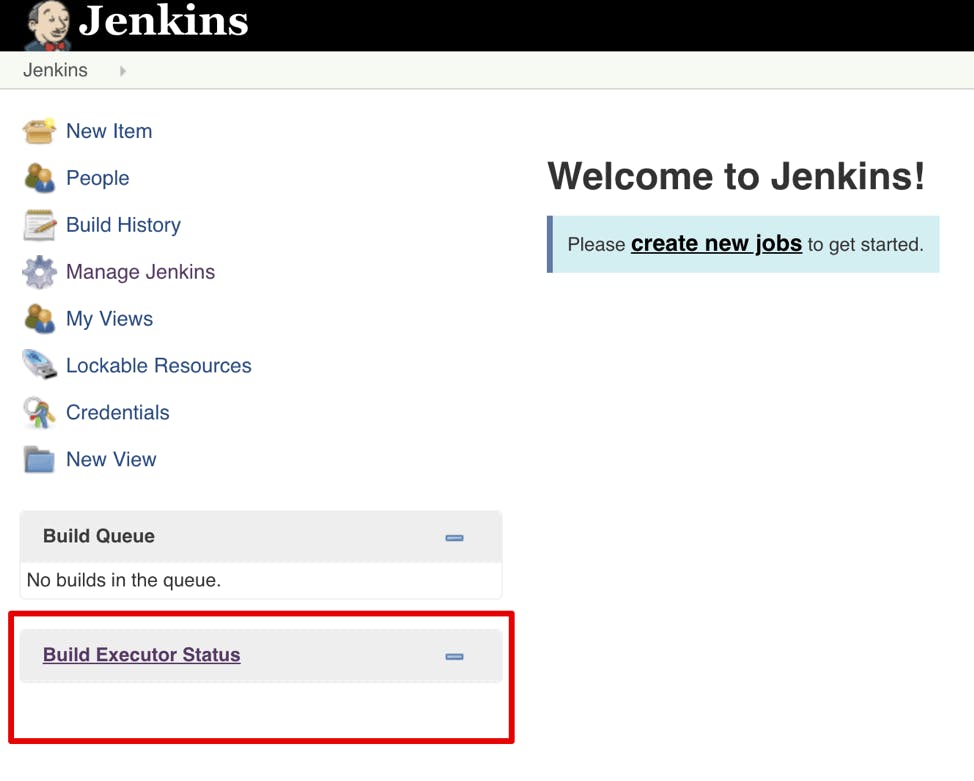
That’s ok — you configured the nodes to run on-demand in a Kubernetes cluster. Have a look at their static configuration in “Manage Jenkins” -> “Configure System” -> “Cloud” -> “Kubernetes”. You should see the setting below. You can also specify the worker pod settings in the build pipeline — a preferred and more flexible approach. To better understand all the available options, here is a description of the primary parameters of a Kubernetes worker pod template:
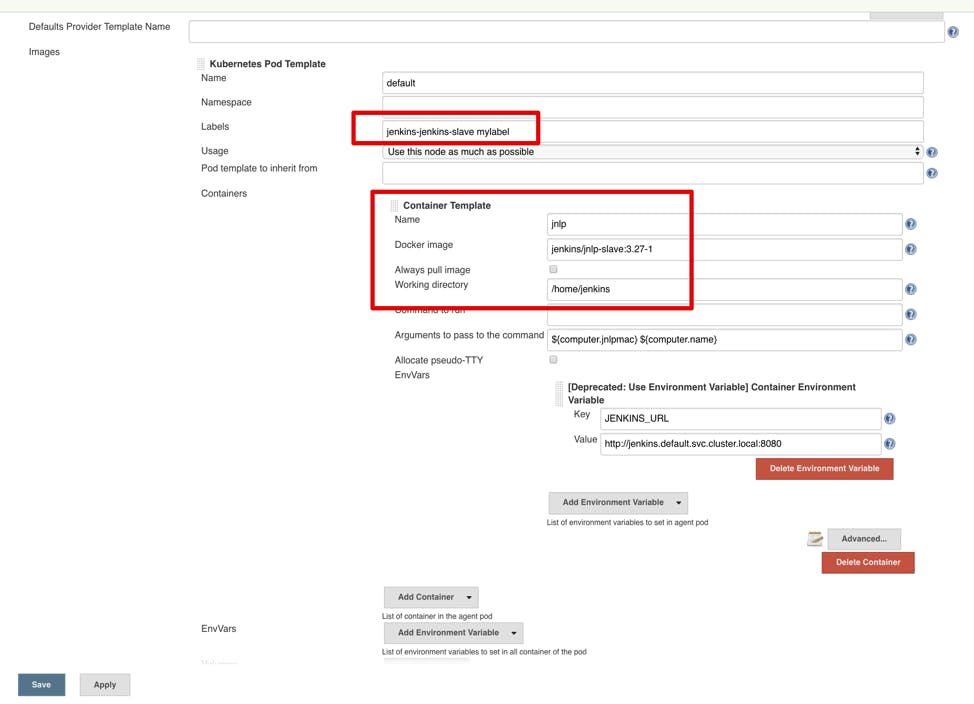
- Name: template name to differentiate between them.
- Namespace: is the Kubernetes namespace in which the build will take place.
- Labels: are the target “node label” for the build jobs so you know where to run.
- Containers: pod settings like Docker image name, working directory (workspace), environment variables.
Pay attention to the additional “mylabel” label in settings. You can run any job with this label and use it as an executor name to create a pod for Jenkins to run in. In the “advanced” section, you can customize the pods’ requests and limits. When creating a template, calculate the limits carefully. Kubernetes might terminate a running pod which exceeds the limits. It’s sometimes better to omit limits and allow the pods to consume as many resources as needed during the build. Unless, of course, you are trying to set up quotas between teams and enforce strict limitations on their cluster capacity consumption.
Chances are, you are not going to use a static template. Each development team has different needs, build tools and dependencies. While some may use the Node.js ecosystem, test frameworks, and tools during the build, others require a C/C++ or Golang environment, etc. Fortunately, you can specify custom worker pod templates in the build pipeline with the Jenkins Kubernetes plugin. That might actually be its most powerful feature. We will discuss this in-depth in our next article on running and deploying the builds. In the meantime, you can read more and explore the features at the official GitHub page here.
Creating a demo build pipeline
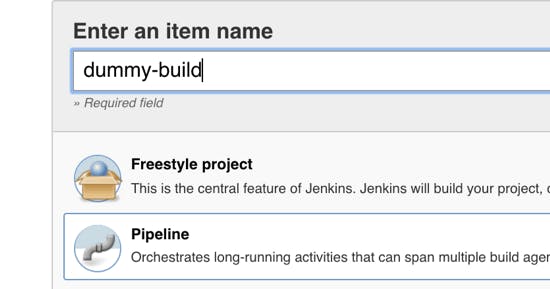
Now let’s try and run a test build pipeline. It will be a quick demo since we’ll provide an in-depth tutorial for production CI/CD on Kubernetes in the next post. Our goal is to make sure that our setup works and then proceed to a Nexus repository configuration. Create a new pipeline job by clicking “New Item,” and then give it a name. Select the “Pipeline” type and click save.
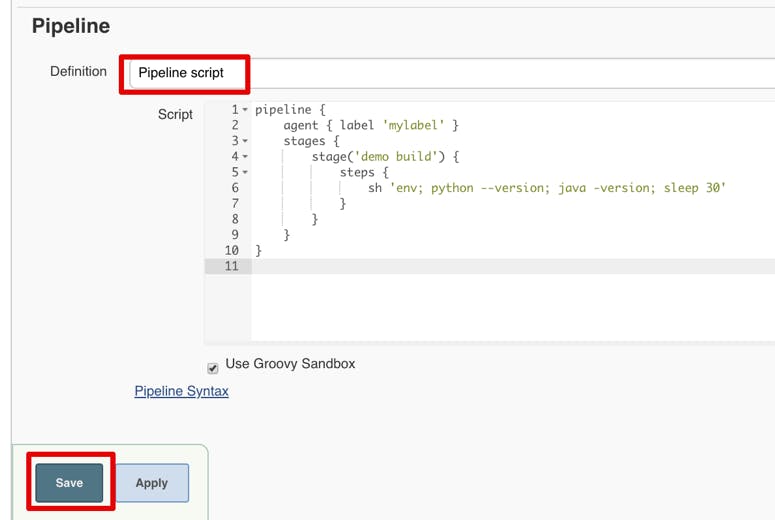
Copy the demo pipeline code and paste it into “Pipeline script” under configuration:
pipeline {
    agent { label 'mylabel' }
    stages {
        stage('demo build') {
            steps {
                sh 'env; python --version; java -version; sleep 30'
            }
        }
    }
}
Then click save:
..and run the job. Wait for the executor pod to start. You will see something along these lines at the beginning of the log (navigate inside the build and click “console” to see it):
Agent default-1cf45 is provisioned from template Kubernetes Pod Template
Agent specification [Kubernetes Pod Template] (jenkins-jenkins-slave mylabel):
* [jnlp] jenkins/jnlp-slave:3.27-1(resourceRequestCpu: 200m, resourceRequestMemory: 256Mi, resourceLimitCpu: 500m, resourceLimitMemory: 256Mi)

Running on default-1cf45 in /home/jenkins/workspace/dummy-build
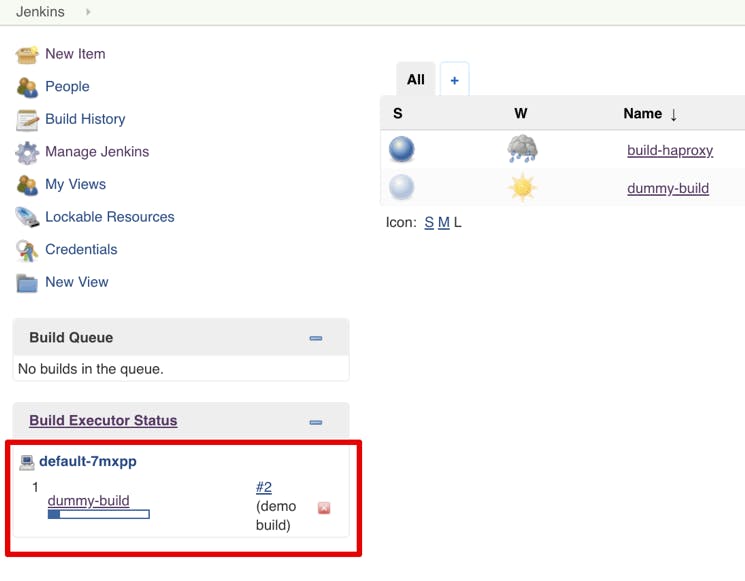
This means that a pod was successfully created and started! This simple pipeline will show all environment variables available inside the container when it runs. Knowing what is available during the build, can help you implement some flexible scripts inside the build pipeline. For instance, accessing the local Kubernetes API to learn about the current state of pods and services, and so on. It will also display the default versions of Python and Java that exist inside the Docker image used as slave base image. If you navigate to the Jenkins’ homepage, you’ll see the ephemeral “build executor” (aka the pod) on the list:
As soon as the build is complete, It will disappear. But the logs of the build remain on Jenkins’ storage (remember the PVC we assigned for persistent storage during the Helm install?). When you decide to use the artifacts for a new job, upload them on storage or save them in your own Nexus repo (we’ll install it in the next step). But for now, this is enough to verify our Kubernetes plugin setup. The Helm chart did most of the configuration. If you have an existing Jenkins installation (and you likely do), all you need is to install the “Kubernetes” plugin and configure it to have access to the cluster where the worker pods will run. We will do an in-depth blog post on build jobs and CI on Kubernetes, multibranch pipelines, GitHub triggers, and the feedback loop with notifications to Slack or Jira, about the build results. But for now, let’s install our local Nexus repository, to be able to store the Docker images and other build dependencies locally in the cluster.
Installing a local Nexus repository on Kubernetes
Here you’ll find a Helm chart for Nexus. It’s well maintained and as official as an open source Helm chart can get. It’s also likely your best available option for installing a repository in your cluster with minimal hassle and maximum flexibility. All configuration options are documented, and you can tweak your installation according to your requirements. An example of a basic setup is described below. You may want to customize the TLS certificates, storage, etc. Depending on your use case (dev, QA, staging, production), you’ll need different specs.
To get the Helm chart ready for deployment on your cluster, download the default values file from the GitHub repo here and update the required parameters:
- statefulset.enabled: set it to true, as the StatefulSet mode will pick up the same physical volume should a pod be re-created. Note, this is a must for a production setup.
- persistence.storageSize: is used to determine the volume size when creating a Nexus deployment. Note, this is not where your artifacts will be stored. The volume will be used as metadata storage — it doesn’t have to be huge. A 10-20Gb volume is generally sufficient. After launching Nexus, configure a new “Blob Store” definition as well as the S3 bucket settings, and ensure all repositories use the new Blob Store.
- persistence.enabled: is set as true by default, and that’s good. It’s Nexus’ primary goal to store image and artifact information persistently.
- nexusBackup.enabled: enables the sidecar container which will backup the repository metadata. Since it supports only Google Cloud Storage as a target for backups, we may not want to use it. It’s fairly easy to set up a backup without this feature. Just make sure to back up the StatefulSet data folder using a script or a Jenkins job for any secure location your organization may use for backups.
- nexus.service.type: is by default “NodePort,” which isn’t suitable for a setup that uses ingress. Change it to “ClusterIP” as we don’t want to expose the service on a host port. It will be accessible through the ingress controller.
- nexusProxy.env.nexusHttpHost: is the DNS address for accessing the UI after deploying the Helm chart. Set is to something like nexus.yourwebsite.com or whatever you’d like to use in your DNS zone for the Nexus web UI address.
- nexusProxy.env.nexusDockerHost: is the address for pulling and pushing Docker images to Nexus’ Docker registry. Specify the address and create a DNS record pointing at your ingress controller. (If you don’t know your ingress load balancer address yet, and you’re following this tutorial with a new Kublr cluster, hang on, we’ll explain it below). Here’s an example: docker.yourwebsite.com
- ingress.tls.secretName: should be set to ‘false’ to use the ingress controller TLS termination which usually has a wildcard “*.yourdomain.com” certificate. It covers all subdomains created for the services. In the demo cluster, set it to ‘false’ for ingress to use the default TLS load balancer. Just skip the certificate warning when navigating to the web UI.
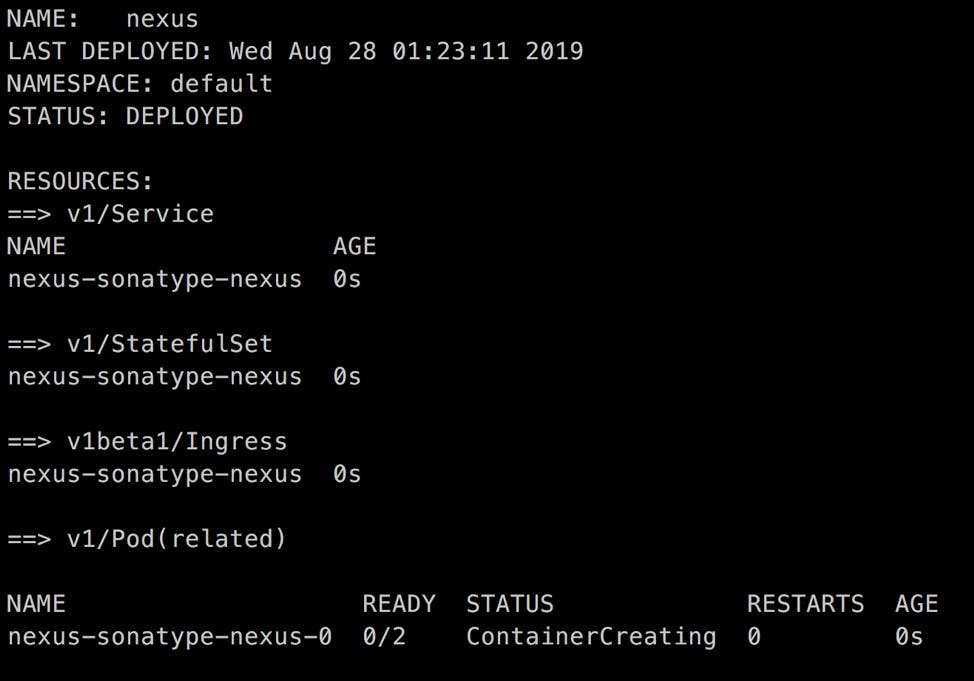
Ready? Then, run the install command specifying the official Helm chart and the newly edited file:
helm install --name nexus -f edited_values.yaml stable/sonatype-nexus
If everything works well, you should see an output similar to this:
If you haven’t created the new DNS records yet and need to find the default ingress controller URL (e.g. in the Kublr cluster), then run the following command to show the needed ingress address. This is where you’ll be able to set your Alias or CNAME records:
kubectl get service kublr-feature-ingress-nginx-ingress-controller -n kube-system -o jsonpath='{.status.loadBalancer.ingress[*].hostname}'
This will display the load balancer endpoint. Go ahead and create the “docker.yourwebsite.com” and “nexus.yourwebsite.com”** DNS records pointing at the load balancer address. After a few minutes, when the DNS records propagate, you can navigate to the Nexus UI dashboard in the browser to configure the Docker registry. But first, pay attention to the admin password in the pod. When launched, a random admin password will be generated for the Nexus container. The UI dashboard will ask you to change the password to a permanent one. The password is located at “/nexus-data/admin.password”. To display it, run:
kubectl exec nexus-sonatype-nexus-0 cat /nexus-data/admin.password
To identify the exact pod name, list all pods with “kubectl get pods.” Since it’s a StatefulSet which names pods by numbers starting from zero, it will probably be called “nexus-sonatype-nexus-0” as in “<helm release>-<helm chart>-<pod number>”.
When navigating for the first time to the newly created “nexus.yourwebsite.com” page and logging into the Nexus web UI (top right corner), you’ll see a quick setup wizard that will prompt you to change the temporary password. It will also ask you whether or not to allow anonymous access to the artifacts.
After completion of the initial setup, browse the existing default repositories to see which storage type they use. By default, they will point to the pod’s PV, which is not what we want. Don’t upload artifacts to the pod’s physical volume. Not, unless you mounted a large Ceph/GlusterFS/other filesystem as physical volume in Kubernetes for that Helm chart. (If you did, however, you probably know what you’re doing and can skip the next section about default storage settings modification in Nexus). We are going to set up a sample AWS S3 storage for artifacts and Docker images.
Navigate to the settings section and browse “Repositories” to see the default options:

Browse any of the listed default repositories to see which blob storage it uses.
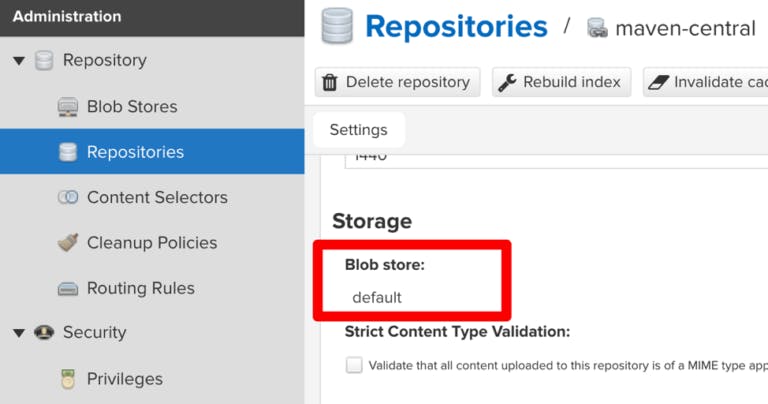
The storage is defined in the “Blob Stores” section of the config (see sidebar right above the “Repositories”).
Now, let’s create the S3 storage for all repositories.
Navigate to “Blob Stores” and click the “Create blob store”. Then, select S3, set a name, and specify the bucket name to store the files. If the Kubernetes cluster nodes aren’t on AWS or don’t have IAM Roles assigned (IAM roles that allows access to the S3 bucket), provide your AWS access keys.
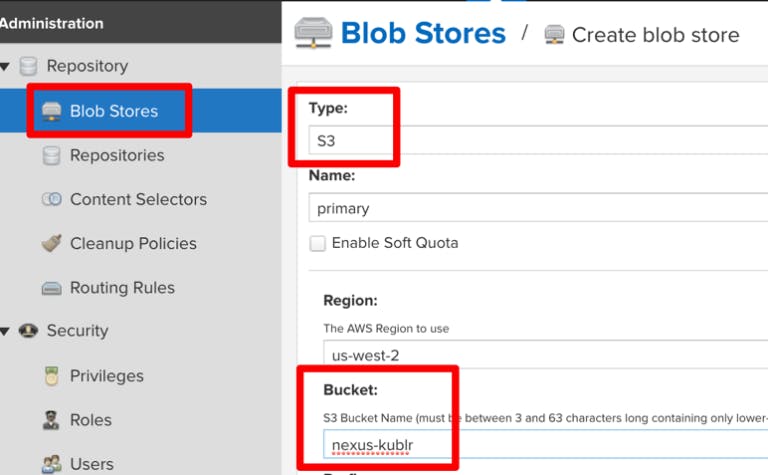
Pay attention to the capacity of our new Blob Store. It says “Unlimited” Yay!
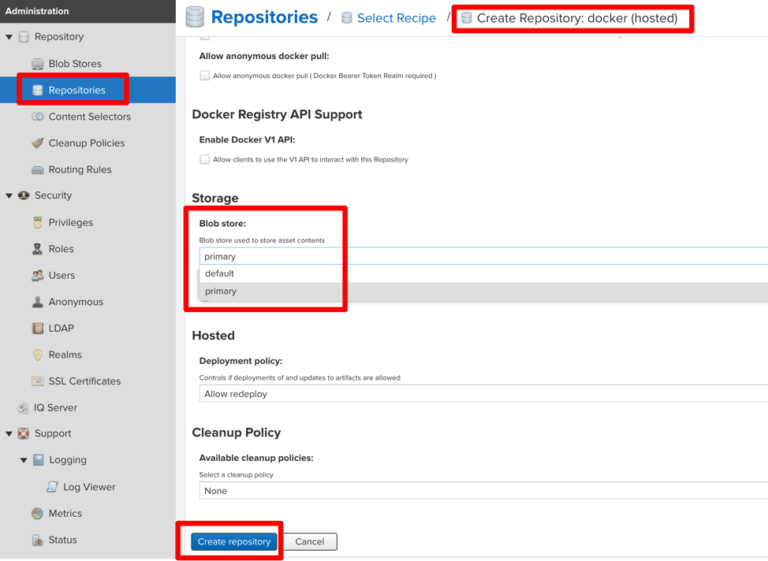
Create a Docker repository using the new Blob Store:
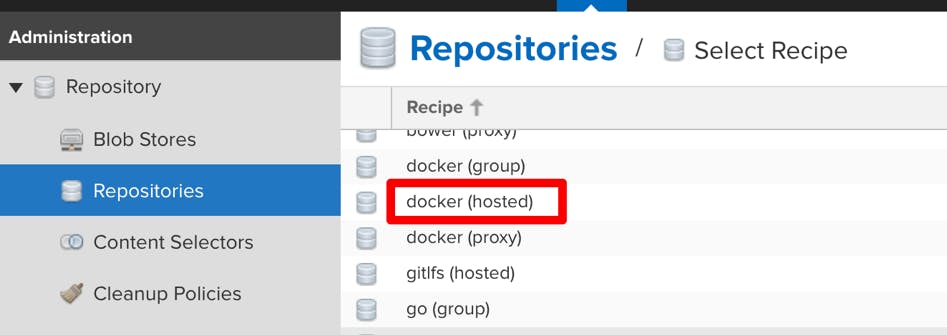
Give it a name and select the storage type. Since we named the Blob Store “primary,” that’s what we see in the selection box. The “default” blob store is, which we shouldn’t use. The “primary” is the newly created S3 store. Select the S3 store, and click “Create Repository”:
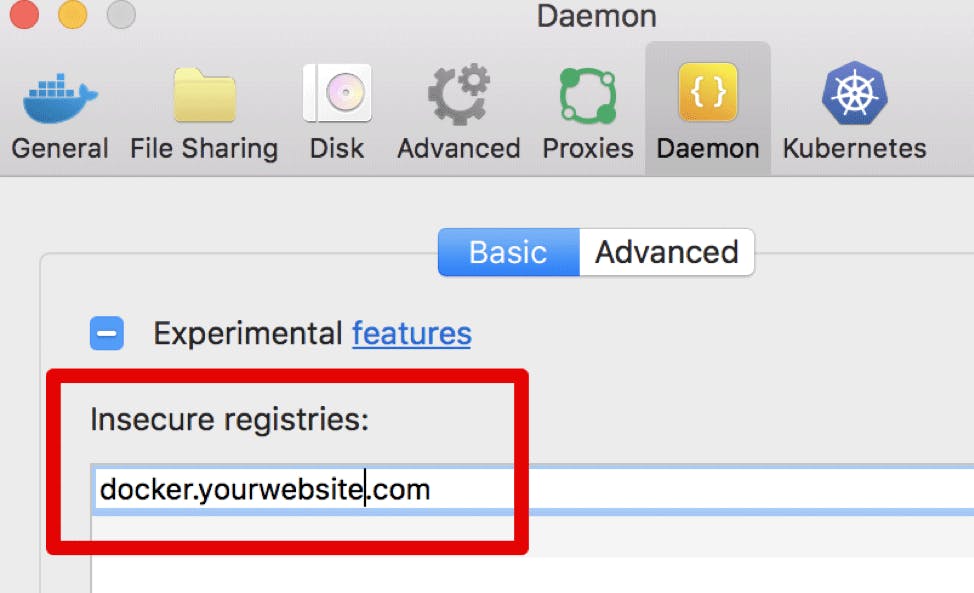
Now, log into the repository with “docker login docker.yourwebsite.com -u admin”. If you used a self signed TLS certificate with your ingress on a test Kublr cluster, the Docker daemon will not allow such a login unless this registry address is whitelisted in “/etc/docker/daemon.json” on the client machine. (Please follow these instructions if you use Windows or Mac https://docs.docker.com/registry/insecure/ ). After setting the whitelist as shown below, try to log into the registry. We used “Docker Desktop for Mac” on a client machine. Here’s an example of how to whitelist the custom registry for this Docker type.
Login with “docker login docker.yourwebsite.com -u admin” and enter the password you set via the Nexus wizard. Try to pull a random upstream image like “nginx” or “ubuntu.” Tag it as “docker.yourwebsite.com/some-test-name” and do a “docker push” for this new tag to push the image to a Nexus registry. The image will be uploaded to our Nexus registry and stored in the S3 bucket. You can now browse the metadata and tags, including the image file-system layers in the Nexus UI:
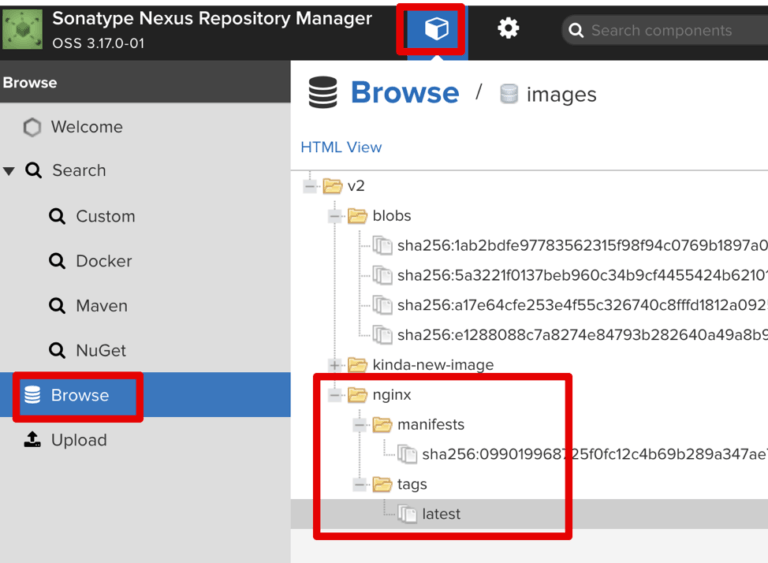
In our example, we can see that “nginx” image was successfully uploaded. Now we can use the image address “docker.yourwebsite.com/nginx” in our pods, to deploy from our local registry. There are numerous benefits to this approach. One of them is full security for your dockerized software in transit. The images can’t be intercepted as they never get transferred through the public internet. If a VPC S3 endpoint is enabled, the S3 storage will be accessed securely by the Kubernetes EC2. This allows AWS instances to access S3 buckets securely via an internal VPC network, never leaving the boundaries of your AWS account and specified VPC where the Kubernetes cluster resides.
This concludes our first blog in a series of posts dedicated to building a production-grade CI/CD pipeline based on open source tools. In the next article, we’ll dive deeper. We hope you enjoyed the tutorial. Sign up for our newsletter in the footer below to get the next blog right into your inbox! Also, please use the comment section and let us know what you think — we’d love to hear from you!